Showing posts with label nail art. Show all posts

Monday, January 18, 2016

Essie Retro Revival 3 of 6: Birthday Suit, Cabana Boy and Starry Starry Night

Hi there, everyone!

I have been out for so long.  I haven't felt like writing anything at all since the last time I did.  I've been active on IG as usual, but not on here (AS USUAL.)  In fact, I'm feeling kind of lazy right now.  I have a lot on my mind, but I'm escaping it by writing this.

I bought half of Essie's Retro Revival just to be able to swatch it.  When my friend Selina (from www.sluenidoesnails.com) and I were talking about this collection, I swore to her I wouldn't buy a single bottle.  But curiosity got the best of me...and addiction, of course.  I got my polishes from Polish Please.


Birthday Suit here took me 4 thin coats.  It was watery and streaky, so I had difficulty with it.   I was surprised to see this lovely outcome after the 4th coat because I was losing all hope after the 3rd.  I thought I was gonna throw this bottle away from disappointment.  I can hardly say I'm happy with it, but I know this is something I'm keeping for the rare times I'm feeling delicate.  This shade is really good for work or weddings, if you're interested.


Cabana Boy was something that I knew I would like, and it did not disappoint, with just 3 thin coats.   It wasn't too hard to work with, compared to Birthday Suit.  It has a slight silver shimmer to it, so it's really unique.  I haven't had any shade like this before.


I only bought Starry Starry Night because everyone was nuts about it.  I wanted to compare to Zoya's Dream, too.  I'm sad to say this falls short of expectation.  It does build up nicely, but is probably a 7 or 8 out of a perfect 10 score.

Here are some stamping I did with these shades:


I hope you guys have a good one!  I'm hitting the sack.

Ciao!

Jamie

Wednesday, May 6, 2015

Bundle Monster BM-618

Hi, Ladies!!

I wanted to try a stained glass effect mani using Fun Lacquer Reunion (H) but it didn't turn out quite well with all the stamping polishes I tried to use.  Gold, Black, White, Metallic Pink.  So I decided to use a pastel base and the image from Bundle Monster BM-618 instead.


I have to say, I picked up the image quite well here.  The plate's image was well-etched (is there such a word?) that it makes a n00b like me look like I know what I'm doing.  I have so many more ideas with this image.  Give me a few more days and I will update some more nail art of the same image.

This Fun Lacquer Reunion (H) is super holo-crazy!  I just borrowed it from my best friend and will be returning it tomorrow.  I am also excited to try this brand out so I'll keep you posted. :)

UPDATE:

 
I did another mani using the same image from this plate.  I reverse-stamped it using colors from GirlStuff AskMeWhats, Topaz Horizon, Sophia and Indigo.  I hope you liked it!
 

Ciao!

Jamie

Saturday, June 7, 2014

Nail Art by Jess Gellada

Hey, Everyone!!!!!!

OKAY? OKAY.  I need water.  I need to drink.  Still giddy from what just happened. In my head, I'm doing a happy dance. *oh yeah, oh yeah, uhhhh yeaaahhhhh!!* LOL!  

FYI, my Daddy-in-law's an artist.  I live with them and see his paintings everywhere inside the house.  Sometimes I see him paint, but never from start to finish (and never on my nails, lol).  I had my mom buy a big life-like koi painting from him. (Will take a picture of that soon and post it here.)  So, anyway, when this pond manicure became popular on IG, I asked him if he could teach me how to paint koi. 

This was our trial mani.  (We didn't do a pond manicure just yet because I currently do not own a sheer green or blue polish.)

 I used Essie In The Cab-Ana for the base, and he used acrylic paint for the koi.  This is a really special mani for me since he showed it to me step-by-step.  I was fangirl-ing so bad. His brush strokes were just incredible.  (He did this in less than 5 minutes.) It reminded me of my old Chinese Calligraphy classes in the past (that I obviously didn't take seriously.)  Hopefully someday, I'll be able to make an awesome koi mani/pond mani, too. 

Thanks, Dad, for taking time to paint art on my nails. I love you. :)


Always,

Jamie

Friday, June 6, 2014

Recreation of ChalkboardNails Fuzzy Monster Mani

Hi, Ladies!

I will try to post once every time I make a mani, and not collect the bunch and then post them all together. 

Today, I ticked off a mani I've been meaning to recreate since I first saw it last year.  I screen-captured it because it was the cutest, most creative use of the feather/fuzzy polish.

I used Orly Beach Cruiser for the base.  And thank god, Chalkboard Nails used the textured fuzzy polish because when I got my Nails Inc. Feathers, I had no idea how to use it.  I just bought it for the sake of trying them at least once.  So, a year and so after the purchase, here I am using Nails Inc Edinburg on top of the Sinful Colors Endless Blue. That's a BK white polish under Sally Hansen Tweedy, Nicole by OPI Ladies In The Limelight under Sally Hansen's Peach Fuzz.  And then it's Nails Inc again with Brighton over Essie Where's My Chauffer.
Anyway, my child's bugging me to paint these little monsters on her nails.  Uhhh, soon.  Lazy mode: ON.  
Now, my next problem is, how and when to use these guys again.  Lol.  Let you know when I think of something original, but don't bet on it. LOL. 
Thank you, Chalkboard Nails for being such an inspiration.  You rock!
Always,
Jamie

Tuesday, May 27, 2014

I Couldn't Help It. I Fell In Love With Morgan Taylor.

Hi, Ladies!

I'm back!  Remember when I first tried Morgan Taylor polish from Beauty Kingdom and fell in love with it?  Well, I couldn't help but buy a few more bottles when I went back to 168 last week.

I promise I tried (at least I did) to avoid the glitter polishes but maaaan, it was too hard.  But good thing is, I also got a couple of creme bottles to try.

 So, this one is a gorgeous lavender color that dries semi-matte, and it's called "Invitation Only".  The square crystal studs are also from the store.  

 This little baby turquoise bottle here, is hard to find.  I tell you, weeks before going to the store, I messaged the Boss to reserve a bottle for me, and he said he didn't have it.  When I got to the store, I looked at his swatch book to check out colors that I wanted, and didn't see this.  But looking at the actual stock rack, I came across this baby, alone, without a name in the book, and wanting a mommy. I HAD TO TAKE IT IN. I had to.  I loved it the first time I saw it on Morgan Taylor's Instagram Account.  You better believe I teared a little when I held it in my hand.  "Lost In Paradise" (but it was, literally, in that polish rack)


 "Best Dressed" is a frosted red that shifts a little gold and a little orange.  Perfect for a formal night out, as the name suggests. The gold ribbon accent was also from the store.  

 "J'adore My Mani" looked similar to "Best Dressed" in the bottle, but I had to take them both home to try, and only to find out that this one is a deep fuchsia glitter that is both sweet and elegant.  How can I not love them all?
"Sweetest Thing" indeed.  This reminded me of OPI's limited Katy Perry edition "Teenage Dream" with its pink and holographic glitters.  
Last but definitely not the least, "Fame Game" is a holographic glitter polish.  I recreated thejuiceboxlacquer's rose-tipped mani for this swatch.  This is a one-coater but is so magical.
 
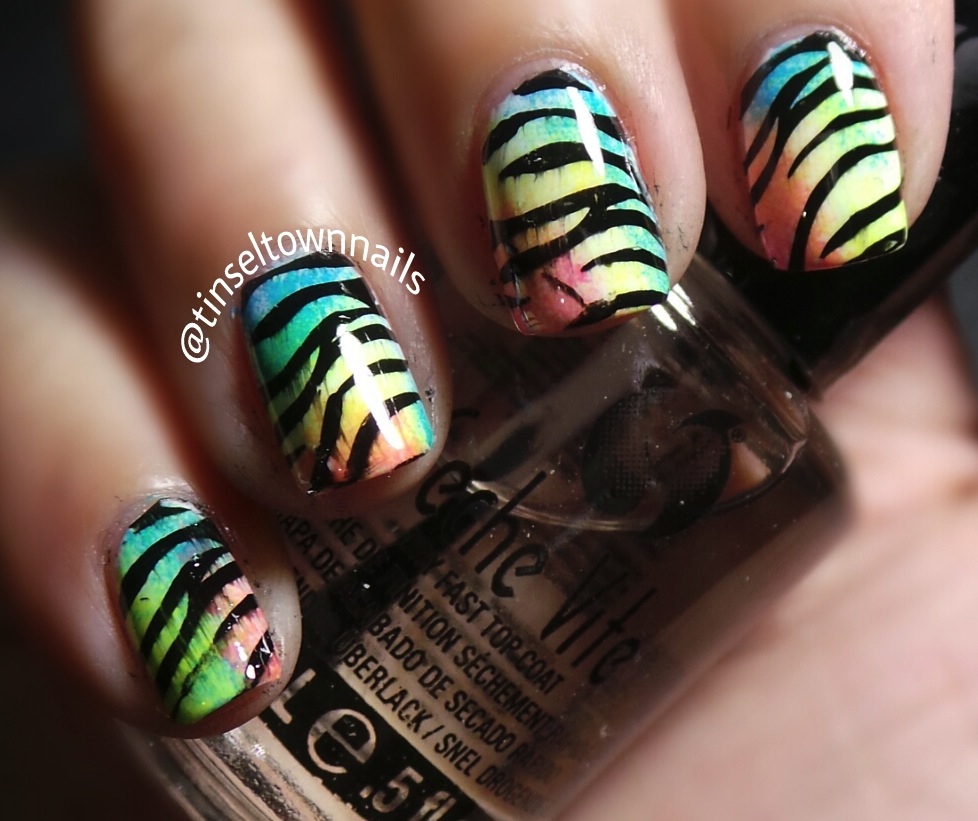
To cap it off, Morgan Taylor is definitely worth all the love I give it.  The colors are all easy to apply, plus I like that the brush is a little hard but dense (it doesn't split from the bunch, if you know what I mean).  My only regret with the trip I made was that I ONLY GOT SIX BOTTLES when I could've gotten more.  I mean for the SRP of 408, and get 30% discount from the Boss???  GO GRAB YOURSELF MORE THAN A COUPLE.  Tell the Boss you deserve that 30% discount, but hurry because I don't know when the promo ends!

All these manis were finished with Seche Vite, of course, also from the store.  And all items were purchased using my own money.  (Well, I wish I could get freebies next time, Boss, eh?) <--Lol, kidding.

Oh, and PS? I couldn't pick a favorite because I love them all equally.

Ciao, Carabao!

Jamie
 

Saturday, April 12, 2014

BK Holo Swatch, Seophora OPI Blasted, and Two Other Designs

Hi there, ladies!

Instagram has timed out in my end of the world so I'm updating here.  

When I went to the Filipinails EB last early Feb., I bought some BK Holo polish to give to my friends because it was on sale.  Not everyone was able to come to the EB so I was left with two extra bottles.  I saw @ejnails use hers a few days back, I got curious and swatched it myself.


What can I say? Not bad for such cheap polish!  I can't believe I got them for the price I did.  I don't think you can get them for that anywhere else!  If you're interested, head on to Beauty Kingdom.  Check if they have stocks left because it's a great deal!!!

And on to the next one.

 I used Lofes 114 for the white base and OPI Fiercely Fiona for the yellow (ring finger) base.  Now when the Shattered / Blasted craze was still on, I got a few bottles of them, and my lovely friends and sister gave me a whole bunch more.  But until now, I can't put them to good use because the texture it gives grosses me out.  So I went on to try again if my reaction's changed over the years.  On pinkie and index, Sephora by OPI Electric Blue Blasted.  On ring, Sephora by OPI Opalescent, and this was a total fail.  On middle, Sephora by OPI Blasted Turquoise Glitter.  Give me a few more months and maybe I will be able to muster the "courage" to try this again.

After that, I tried to recreate adelislebron 's design.

So in love with her design.  I used Zoya Pippa for the yellow base, and Lofes 114 for the white, Acrylic Paint for the black & gray colors, then Seche Vite top coat.

Now this, I was going for a good gradient, but I still couldn't perfect it, that's why I placed on an "Elegant Swirl" design, which, of course, was another big fail.  I mean, check it out:

 Elegant = sophisticated, but my drawing hand was too heavy and I couldn't make my swirls thin. :( Oh well.  Anyway, I used Sally Hansen Man-go Team! and Deborah Lippmann Between the Sheets for the gradient.  Acrylic paint for the black, and Seche Vite top coat.

Maybe tomorrow I will do some swatching for my untrieds. :)  Ahhh, that is the goal.

Ciao!

Love you long time,

Jamie
 

Friday, April 11, 2014

A Couple of Besties

Eh, hey, hey, girls!

I have been out a few days doing some paperwork so I wasn't able to update you on here.

I was supposed to post back-to-back bestie twin nails with @ayabananna but was only able to do so on my Instagram.

Aya was the one who made this very dainty design, perfect for Spring / Summer!  I fell in love with this instantly!


Don't you agree?  I mean, even with my lousy recreation, lol, I still like it!!  I used Essie Tart Deco (orange), OPI Fiercely Fiona (yellow), and a combination of OPI Don't Bossa Nova Around & Ski Slope Sweetie for the bases, and then acrylic paints.  I forgot to use a matte top coat, so I used my usual Seche Vite.

And, my solo:


And then the day after, I did another bestie, but this time with @bhagzcy08.  She threw in her design and I obviously liked it so I did it soon as I could.  It reminds me of Juicy Fruit and Double Mint Gum combo.  Jen was also the one who designed our collage.  Thanks again, Jen!!! <3

 
 Simple but summer-y leopard print mani.  I used Color Club Twiggie and OPI Fiercely Fiona, acrylic paint and Seche Vite Top Coat. :)

Hopefully I can use my Saturday and Sunday to do nail art.  Otherwise, I just might swatch my untrieds.

Goodnight!

Love you long time,

Jamie

Sunday, April 6, 2014

Gradient Tutorial, Guest Post by @hotmomsnailarts

Hello, Ladies!

I have here a gradient tutorial done by the (master of gradients) amazing @hotmomsnailarts!  


(1) Materials used from left is Nature Republic colorwaltz topcoat, Lofes Manicure in 648, Lofes Manicure in 644, Rhinestones, and sponge wedge. 

(2) After applying your base coat, apply two thin coats of the lighter color. 

(3) On the sponge wedge place the nail polish colors vertically. 

(4) Dab the sponge with the nailpolish over the nails with the lighter color. 

TIP: Make sure that the sponge is not too wet nor too dry. This is to ensure that the color will blend at the center. Once the sponge gets sticky make sure to apply another coat of polish in order for the sponge not to stick on the nails to have a seamless color. 

 (5) Clean the edges using a flat brush. 

 (6) Place the rhinestone of your choice. I used a square shaped purple rhinestone. 

(7) Finish off with top coat to seal the gradient and the rhinestone.

Please check out her IG account for all her awesome nail designs.

Thanks so much, Mariel, for doing this post for me.

Love you long time,

Jamie 

Saturday, April 5, 2014

A Kind-Of-Busy Saturday

Hi, Ladies!

I have been busy doing manis today.

Started my day by swatching OPI's Muppets World Tour over Orly's Dare to Bare:


I had a hard time painting Dare to Bare on my cinderella hand, plus the fact that I was rushing, but Muppets World Tour covered it all up.  It was such a magical bottle of white glitters with some silver, metallic blue and pink glitters here and there.  I tell you, I am not huge on glitter polishes because I always have a hard time scooping the glitters out.  This MWT (Muppets World Tour) though, the glitters just go with the brush.  It was so easy to apply, I feel like using this all the time (next time on a different base color, of course.)

And then I felt the need to swatch what my BFF Goddess Uy gave me as Christmas Gifts:

 These are Ruby Wing Electric Firefly (yellow) and Groupie (pink).  May I just say that I am soooooo in love with them???  Look at what it shows up as indoors (left picture) and then outdoors (right picture).  Isn't it just awesome?!  I mean, I have heard so much about Ruby Wing polishes but I have never thought of buying them because I never knew they had neons (sucker for neons here.)  So, from the bottom of my heart, THANK YOU, Goddess!

Again, the indoor shot:


And the outdoor:


And then I was off to do a bestie mani with Ayabananna.  I asked her to design a mani for us to do, and she came up with this design, which frankly, was tiresome for me because I suck at striping tapes...BUT I am sooooo glad that Aya agreed to do one with me, so I had to make an effort to do it half as good as hers.  Thanks, again, Aya, for such a wonderful blue mani so apt for April being Autism Awareness Month.  Aya also did the collage for us, so I was mainly sitting lazily here.

Solo shot:


I used Korean brand Lofes #646 for the pinkie, Tony Moly ME05 for the silver, Essie  Borrowed and Blue for the lightest blue, Sally Hansen Insta-Dri Blue-Away, and then OPI Eurso Euro for the middle finger.  Bought the studs from a night market in Canada, but there are a lot of studs sellers online.  Seche Vite top coat, of course.

And after all that, I was able to do an easter mani, which turned out funny-looking.  I have zero (0) talent drawing anything, so I apologize for this:


 I just used Lofes #114 for the base because my Skin Food's retiring on me.  The rest are acrylic paints.  Seche Vite top coat.

WHEW!  I bored you, didn't I?

Enjoy your Sundays, everyone!

Love you long time, 

Jamie

Friday, April 4, 2014

Animals for Kids

Hi, Ladies!

It's Friday night and I'm stuck at home with my little princess.  We were watching Land Before Time and I suddenly decided to do an Animal Mani for her.  Well, not exactly ON her nails, but she was watching me do these simple (yes, that's the only thing I can execute) nail arts.

I did one on each nail.  Here they are:


On the seal:  Skin Food BW704, Sally Hansen Insta-Dri Blue Away and Black Acrylic Paint.

On the (supposed) duck:  Sally Hansen Insta-Dri Lightening, OPI You Don't Know Jacques!, Skin Food BW704 and Black Acrylic Paint.

On the frog: Revlon Posh, Sally Hansen Insta-Dri Lickety-Split Lime, Skin Food BW 704 and Black Acrylic Paint.

On the monkey:  OPI You Don't Know Jacques!, OPI Don't Bossa Nova Me Around, Skin Food BW704 and Black Acrylic Paint.

I used Seche Vite Top Coat, as usual.

I bought my Skin Food polish in Korea, but most SM Malls have Skin Food Boutiques.  My Sally Hansens I got from Canada's Shopper's Drugmart.  Revlon polish was from PCX.  My OPI polishes are from Polish Please PH.  

I love all of these polishes because they are all so easy to apply. (Plus the Sally Hansen Insta-Dri polish is true to its name.  It dries really quick.) Except maybe for the Skin Food one because it's all used up and gloopy now at half the bottle.

Oh, before I forget, I used the animal inspiration from some notebooks that I saw before.  I just forgot where.  I will update if I remember. 

Hope you like 'em!  My daughter does.  (She better like it or else!!! LOL!)

Have a good weekend!

Love you long time,

Jamie

Thursday, April 3, 2014

Bestie with @mcbnails
Hey, Ladies!

May I just say that I am a free woman?! I have finished all my work for the week so you won't be hearing anything stress-related from me until Monday. Lol!

I have talked about doing a bestie with my newest buddy, Ayen, a.k.a @mcbnails.  She gave me a lot of nail arts to choose from but we settled with @sprinkledwithglitter 's design.

Here.


I used Essie Van D'Go and Inglot 390 for the base, Essie Tart Deco and Bikini So Teeny for the stripes, Gold and Blue acrylic paints, and Seche Vite top coat.  You can purchase your Essie polishes at Polish Please PH, and your Inglot at Glorietta 5.  

Oh, here's my solo shot, before I start yakking on:


There.  Let me tell you about my good friend, Ayen, now.   Okay, briefly.  

Ayen is one of the bravest women I know.  She suffers from MS, or multiple sclerosis, a degenerative disease (Please correct me if I'm wrong, or google it if you want to know more.)  But you won't even realize that if she doesn't tell you.  She stands strong, and is always beautiful.  Even with her sickness, she finds the time and effort to do the things she loves, including nail art.  Go ahead, check her IG out and see for yourself.  @mcbnails She inspires me because her strength is unbelievable.   

I hope to be doing more nail arts with you, Ayen.  Know that I am always here for you.  

Enough drama and let's go on with our lives, shall we?

Love you long time,

Jamie


Wednesday, April 2, 2014

Hey, Ladies!

My day didn't go too well today.  I'm hoping for a better day tomorrow. Here's something I have been imagining: a spring mani.  It looked soooo much better in my head!! :))

Sometimes I don't know if I should concentrate on one technique first and master it instead of trying to do everything all at the same time.  

Anyway, here it is:


I used Sally Hansen's Blue-Away.  I got this from Canada's Shoppers Drugmart.
The acrylic paints I got from Deovir in SM Megamall.  And I topped this mani off with Seche Vite.

That's it for now!

Love you long time,

Jamie 

Tuesday, April 1, 2014

Having a Break

Hi, Ladies!

I don't have any April Fool's joke on here.  I am so stressed out from work, I'm actually still doing my worksheet and just having a break.

I found a design I liked from @anggieanggey and decided to imitate it.


I know, I ruined the pastels with my lousy drawing.  :( 

I used Essie Van D'Go, Under Where?, Mint Candy Apple and Zoya Pippa. Skinfood BW704 for he white.  Acrylic paint for the black.  Seche Vite Top Coat. If you don't have any access to these brands, you can check out Polish Please PH

Okay, my time's up! I need to get back to my papers.

Have a good one!

Love you long time, 

Jamie 

Monday, March 31, 2014

Bestie and Another

So, my fellow Filipinails member, Aiza Mamales, proposed a bestie with anyone and I grabbed the opportunity.  She made me choose the design we were going to recreate, and I stumbled upon Autumn Nicole @justagirlandhernails' watercolor mani.  We agreed to do it right away! 

Here's Aiza's (@icelovesnailpolish) solo shot:


And here's mine:


Obviously, I didn't do too well again, because the "watercolored" flower looked abstract. Lol!  

I used China Glaze's Bottoms Up (pink), Skinfood BW704 (white), and acrylic paint.

Anyway, here's the bestie mani collaged:

 
Thanks again, Aiza, for doing this with me.  I am honored to be doing nail art with such an awesome nail artist as you.

Aaaaand because I am an insomniac, I was just staring into my computer and went ahead and did another stamping.  You will laugh so hard because I didn't bother re-doing / covering the failed parts.


Tadaaaaa! I was inspired by my computer. Tsk.

So I used Revlon's Posh for the green, OPI's Golden Rules!, Crystal brand black polish, and BK white polish + the Bundle Monster BM-415 plate (Thanks again, Mae Espiritu.)  I had better be practicing 28,000 more times to be able to perfect the stamping technique.  And I need all your tips as to what polishes work well for stamping.  The OPI was the best I could come up with.  I tried Essie's Penny Talk but it dried up too fast the stamper couldn't get the image.  Sparitual's Gold Digger wasn't opaque enough.

Oh well, that's it for today!  Have a good start to your April!

Love you long time, 
 Jamie


Sunday, March 30, 2014

Quick Water Decal Mani

Hey girls!

I can't seem to stop thinking about work. Ugh, tomorrow's Monday and I have tons of stuff to do.  It's already about 2AM, and to stop stressing, I decided to swatch a couple of the OMG polish.  

OMG is readily available anywhere here in the Philippines (Hortaleza, any big Department Store / drug store) ranging from P19-P30.  I got mine for P23 each at Metro Dept Store in Marquee Mall, Pampanga.  I am not even kidding, they have the biggest OMG collection there, I flipped.


These are Banana Boat and First Date.  The colors remind me of ice cream.  The formulation's great!  They dry quickly, too!  Not bad for some cheap polish!  

According to my friend Mariel @hotmomsnailarts, these are great to use for water marbling!  (Check her IG out, she makes awesome water marbling and gradient manis.) 


And because I suck at water marbling, I decided to use water decals to decorate my swatches.  I got these from 168 mall for about P15.  It's actually my first time to try them out, so, again, I apologize if the decal creased on me.  Hopefully, after more practice, I can show you ladies some good nail art.

I guess I need to sign out now and face Monday.  Hope you have yourselves a great week!

Love you long time,
Jamie
 

Friday, March 28, 2014

Stamping: The Sinagtala Experience

Hi, Ladies!  

I asked a little help from my friend, Mae of artofnail.blogspot.com and started my own nail blog.  We were up at the Sinagtala Farm Resort and Retreat Park in Orani, Bataan for a quick meet-up with Mia of miawrrr.tumblr.com.  These two are a couple of the most awesome Filipina (represent!) nail artists I know.  I was so lucky to be able to spend time with them and get tips about nail art, photo editing, etc. 

But enough chitty-chat.

Here is a picture of a rushed leadlight stamping technique shown to me by the Master of Nail Stamping (Mae).


Pardon the job that I made here because we were busy catching up about life.  I didn't notice how badly I was holding her Anna Sui bottle until I posted this picture on my instagram account.

And so now, I'm back home, trying out this blogging thing.  I also tried to do some of my own stamping (the supposed easy, regular one, without special techniques) but I failed so horribly by putting on top coat while my special polish was still wet (thus, the bleeding.)

 I promise to try harder and better next time. I'm too exhausted to even think now. (Excuses...)

Love you long time,
Jamie